background

Tuesday, November 21, 2023

I'm Moving!!

 In an effort to build my pattern designing business, I now have my own domain!

Visit my NEW blog at: thewhimzb.com 

Come on over and see me :)


The content of this blog did not transfer to the new blog and this blog will not be deleted. I may post different things on this blog than the other one, so be sure to check back!


Monday, September 4, 2023

My latest pattern: the Scarecrow Shelf Sitter!


Recently, I released my second shelf sitter pattern... this adorable scarecrow!!! Ya'll know I LOVE SCARECROWS! They and pumpkins are my favorite fall things. Don't you love their cute little overalls?? He kinda reminds me of my GrandadπŸ’š.  One thing scarecrows always remind me of are sunflower fields. In Arkansas, highway 7 is the scenic highway. When I first married my husband, it was a highway full of wonderful gift shops showcasing crafts made in the Ozarks. And another site that you could see every late summer, was a large sunflower field with a few cute, authentic scarecrows giving you a wave as you drove by. It is one of my favorite memories. Sadly, those days are gone and most of the shops have closed down and the sunflower field is now owned by the Highway Department. 

I had the Best group of testers for this pattern. They are so valuable to me. Not only are they testing my patterns, but also teaching me at the same time. Here are their finished projects:

Thank you Wendy, Donette, Leticia and Ashlee!!

Thank you Sara, Reilly, Ana and DemiRae!!

Aren't they all wonderful!! As a creator, the greatest joy is seeing others use your pattern to create their own version. I love them all. 
This pattern was created using acrylic yarn, but was also tested and approved with cotton and plush. Sara used cotton and Reilly used plush. Yay!! I also made one using yarns from the Dollar Tree and using raffia (also from the Dollar Tree) for the straw. I thought attaching the raffia would be the death of me.. but I survived!!

Turns out... he is my favorite!!!

The pattern is available in both my Etsy Shop and my Ravelry Store. 

Some of my testers have crochet pages on Facebook and Instagram... go follow them for some wonderful crocheted items!!

Facebook:

Instagram:


Saturday, September 2, 2023

Bunny Baby Gift Set


 I recently finished up a giftset for a coworker and wanted to share it with you guys! I wanted to use supplies I already had on hand to see what I could come up with. I have had a large piece of this bunny flannel for YEARS that I picked up at JOANN's and have made many burp cloths with. I also had some coordinating pink fabric scraps for decades that may have even been in my Mom or Grandmother's fabric stash. As I looked at these fabrics, the set came together in my mind... burp cloths, a crocheted lovey and some type of crinkle toy (I used to make those quite often as gifts). 

As I perused Pinterest for inspiration, I kept seeing these bunny ears on a wooden ring. I loved them, but they were all pretty large, and I was keeping to a tiny theme. I found the perfect pattern by Petit bout de chou HERE. It was just the right size. I used her pattern with a piece of cotton and a piece of flannel. Since I wanted to make it a crinkle toy, I used a cereal box liner that I had cleaned up and saved for just this purpose. I cut out two pieces from the liner that fit in the ear part only (not the center where it will go around the wooden ring. Then it was pinned to the fabric (wrong side) and sewn onto the ears as I sewed it together. 


The wooden ring is a macrame ring. It was the only wooden ring I could find locally. I decided at the last minute that I didn't feel comfortable with giving it to a baby. I could just see it splintering as they chewed on it!! So I decided to cover the ring with ribbon. Using grosgrain ribbon from the Dollar Tree, I attached it with glue just at the ends and hid them under the ears.

Right before I gave the gift away, I decided against giving these cute bunny ears. I realized too late that I should have glued the ribbon on all the way around as I wrapped it because it can shift easily, even though I thought I was wrapping it tightly... and the pink ribbon was not the same pink as the ears. Oh well, there are plenty of babies coming... I'll redo it and save it for another one.


The crocheted lovey is a pattern I wrote up. You can find it for free HERE.  I used a pale pink for the second color to match the burp cloths. It is a beginner friendly pattern and works up very quickly.

The burp cloths were made using a pattern from sweet red poppy HERE. I know I have my own burp cloth pattern here on my blog, but I wanted to make a cute, tiny set. She uses quilting cotton in her pattern, but I used the bunny flannel on both sides. 

I thought this set came out lovely... and so did the parents.. and THAT is what makes handmade gifts worthwhile!


Saturday, August 26, 2023

Free Crochet Pattern: Little Lop Eared Bunny Lovey


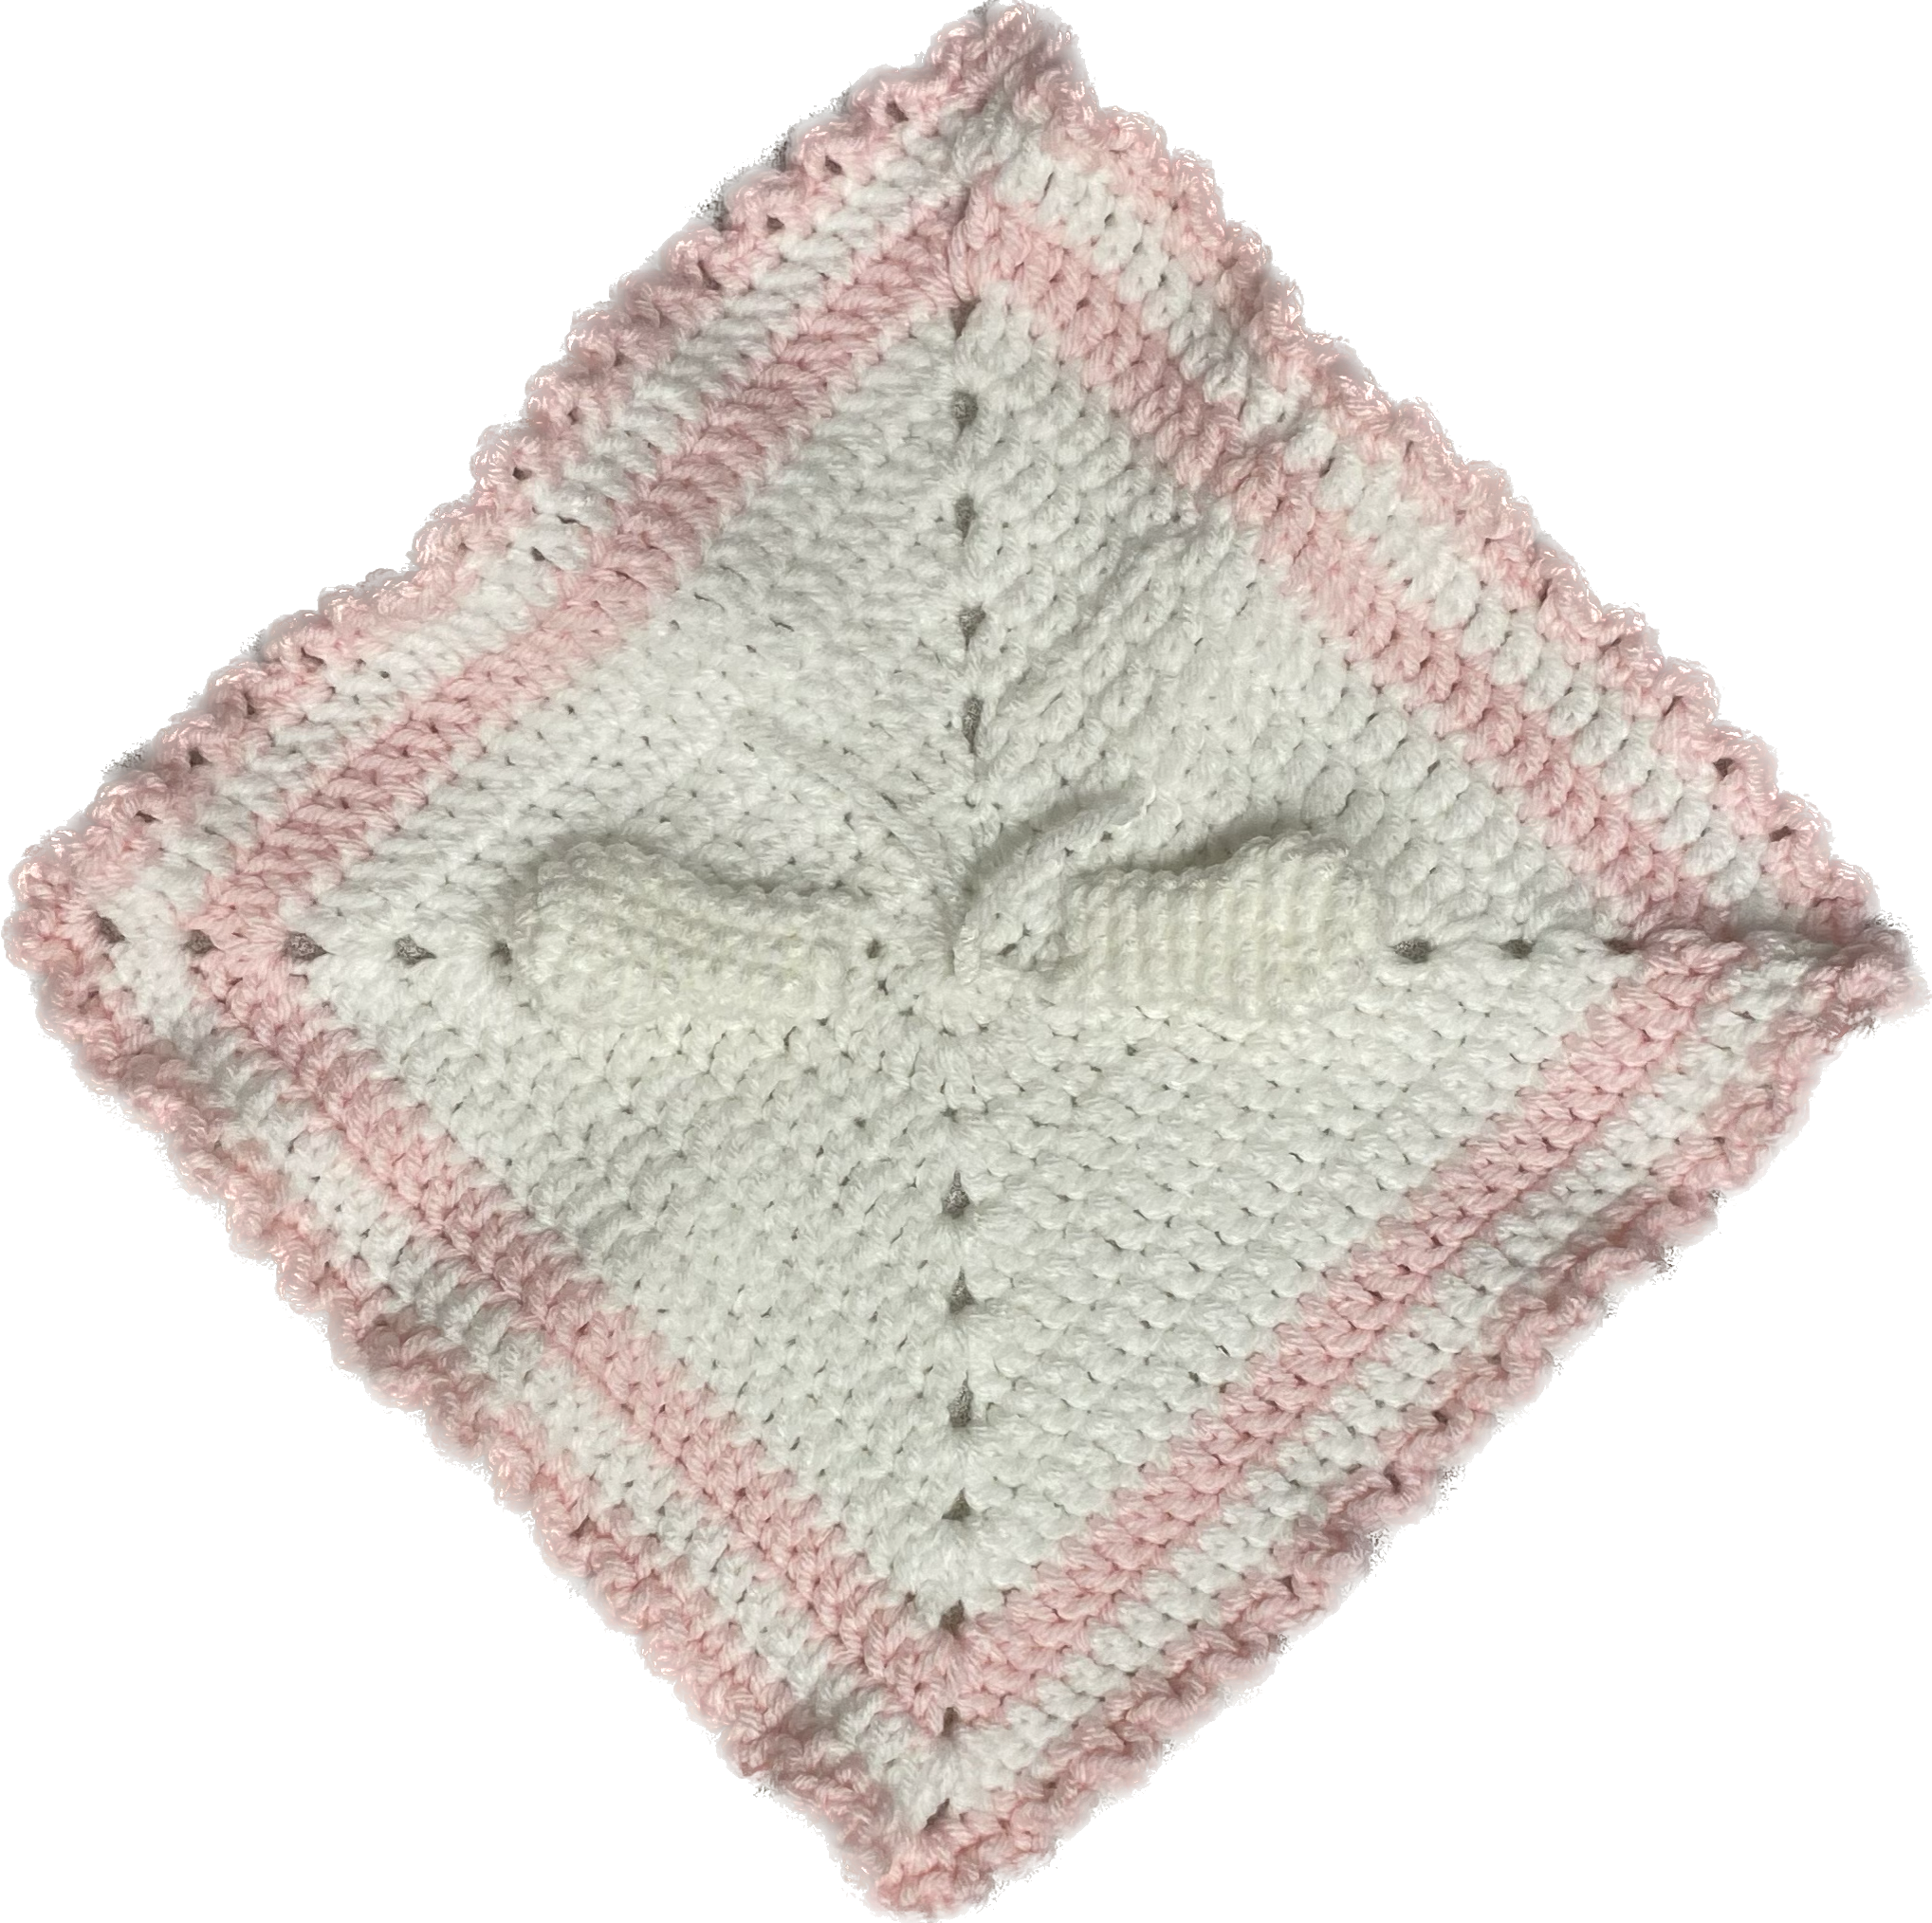
Ya'll know I love bunnies... right? I have another baby gift to make for a coworker and this time, to accompany the burp cloths (not made yet 😟) I wanted to make a little lovey. Most of the patterns I found were for larger lovies... but I love tiny things... especially for babies. So I decided to write a pattern for one since I had already wrote a pattern for the Lop Eared Bunny Shelf Sitter. 

After a LOT of trial and error, I decided on the blanket being a solid Granny Square. I found a very helpful video that explains how to make one. If you are not familiar with the solid Granny Square, please watch this video before starting because I do not go into great detail in the pattern. 

My lovey was made to match the fabric for the burp cloths and is for a baby girl, so white and light pink were the colors chosen. This is sooo easy!! Are you ready to make one?

This pattern has been revised and re-written. It is available on my New Blog:


Yarn: 2 colors, your choice of yarn. One skein of the main color will be plenty.

 Also a small bit of black for the eyes.

 I used “I Love This Yarn” from Hobby Lobby in white and soft pink.

Hook: F (3.75mm)

Stuffing

Yarn Needle


Head:

R1: MR 6 SC (6)

R2: INC around (12)

R3: *SC, INC* around (18)

R4: *SCx2, INC* around (24)

R5: *SCx3, INC* around (30)

R6-12: SC around (30)

R13: *DEC, SCx3* around (24)

R14: *SC, DEC, SC* around (18)

R15: *SC, DEC* around (12)

Stuff head firmly, but

DO NOT OVERSTUFF

R16: DEC around. (6)

Cut a long tail and use needle to weave in and out of the front loops of R16.

Pull tight to close. Weave in and out a few times. Leave tail to attach to blankie.

Add your facial features.
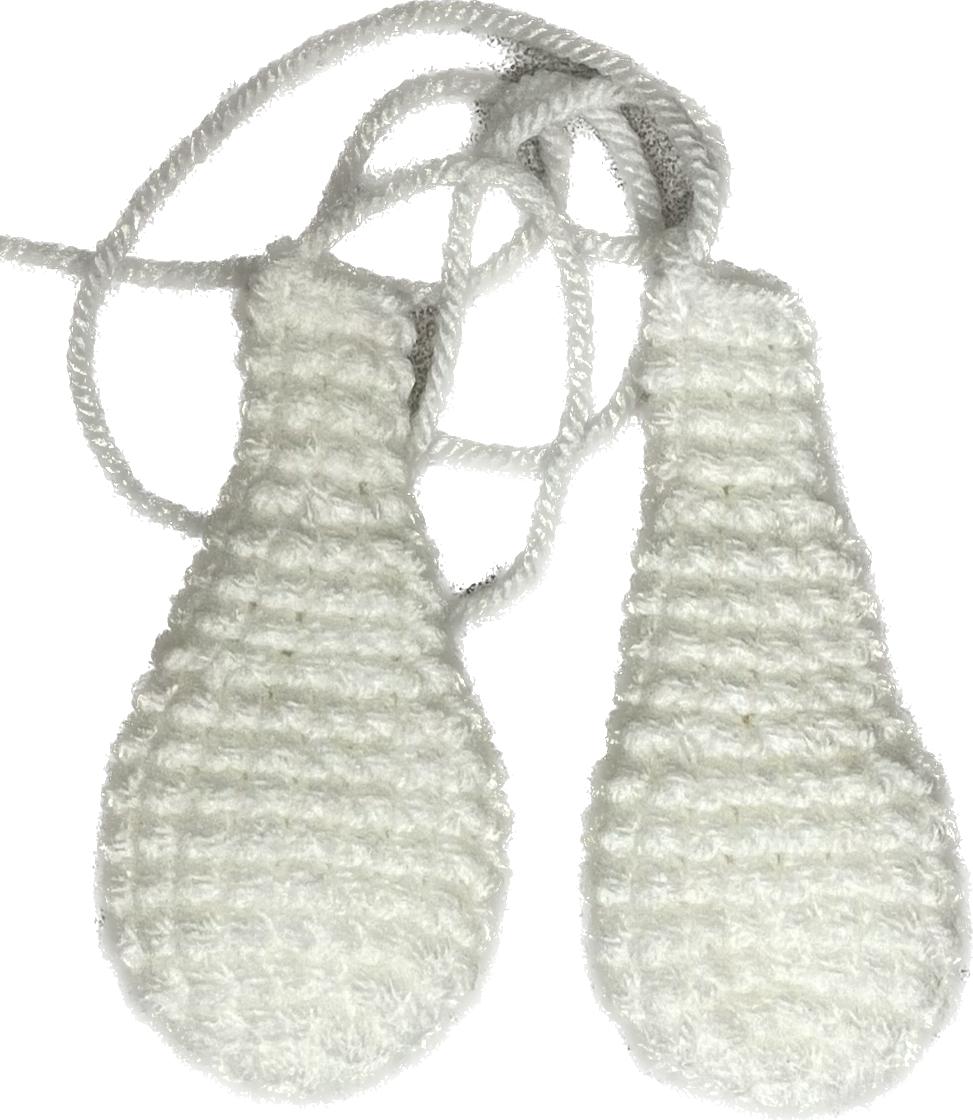

Ears: (make 2)

R1: MR 6 SC (6)

R2: INC around (12)

R3: *1SC, INC* around (18)

R4:-8: SC around (18)

R9: *1SC, DEC* around (12)

R10-13: SC around (12)

R14: *1SC, DEC* around (8)

R15-18: SC around (8)

Leave a long tail to sew onto the head.

Pinch sides of the ear together and use the tail to weave in and out of
both sides to close the ear. (4 sts) 
Sew ears onto head in the 3rd row from the top.
Use pins to hold ears in place while you whip stitch them onto the head.


Paws: (make 2)

R1: MR 6SC (6)
R2: INC around (12)
R3-4: SC around (12)

R5: *SCx4, DEC* around (10)

R6: *SCx3, DEC* around (8)

R7-10: SC around (8)

Pinch together and SlSt across (4)

Leave a long tail.


Blanket:

The blanket is a solid granny square, but modified to create a base to

sew the head onto.

Here is a wonderful, helpful video that explains the solid granny square.

R1: MR 12 DC. Join with a SlSt in the top of the first DC(12)

R2: Ch3 (counts as the 1st DC throughout the pattern), DC in same st.

     INC around. Join to 3rd ch with SlSt. (24)

R3: Here we are going to make the circle into a square.

Ch5, 2DC in same st.(1st corner)- *DC-HDC-SC-HDC-DC* across. 

[2DC, ch2, 2DC] (2nd corner made) Repeat *-* across. 

Make 3rd corner. Repeat again and end with 2DC in the last st. 

Join to the top of the Ch5.

Now you have your first round of the solid granny square made.


Following the instructions in the video, you are going to continue

enlarging your granny square. Each row adds 4 sts. 


R4: Ch3. Make corner in next st. DC across (9). Make next corner and
continue pattern. In the last row you will make (8) DC and join to the
top of the Ch3.

R5: Same technique as R4. You will have (13)DC between corners.

R6: Same technique as R4. You will have (17)DC between corners.

R7: Same technique as R4. You will have (21)DC between corners. 

When you SlSt at the end of the round, bring up your second color. 

R8: With 2nd color, continue the pattern.

You will have (25)DC between corners.

At the SlSt at the end of the round, bring back up your first color. 

R9: Same technique as R4. You will have (29)DC between corners.

Bring back up your second color in the SlSt. 

R10: Trim. With 2nd color, *Ch3. SC in next 2 sts*. Repeat*-* around. 

Corners: Make 3 of these “loops” into each corner. You may go into

a corner with a Ch3 or come out of corner with a Ch3 and that’s ok. It

doesn’t have to be perfect. Just keep going. End with a SlSt in first ch.

Tie off. Weave in ends.


Assembly:

Sew the paws on first. Face the blanket towards you on the diagonal, with

the seam at the back.

The paws are sewn onto R2 using the tails.


After sewing both paws on, weave the tails toward each other and tie together.

I tie mine 5-6 times. Trim.

The head will be sewn onto the blanket between R1 and R2.
This is the view from the backside.


After whip stitching it on, take your yarn through to the back of the blanket.
Weave the tail through the blanket and head a few times to give it extra hold.
Tie off and weave in end. 


And now you have an adorable baby gift!


Sunday, August 6, 2023

Crocheted Strawberry Pincushion Pattern


Reduce, Reuse, Recycle... I LOVE finding new purposes for used things!! Those Oui yogurt jars are too cute NOT to be reused, but I was having trouble coming up with any ideas.

On another note... As a sewer and crocheter, I use pincushions and thread/yarn catchers often. I don't like using regular pin cushions for my dull yarn needles, so I've been toying with ideas for a crocheted one for awhile, but never found the right one. 

Eventually, those two problems (what to use the jars for and a pincushion idea) finally came together in my mind and I had the perfect idea... a crocheted pincushion "topper" for the jar!

Since I absolutely πŸ’— strawberries, that was my #1 choice for a pincushion. I had also been toying with the idea of putting ribbons on the top so that I had something to hang my stitch markers on. So I thought green ribbons would be perfect to top my strawberry with. The first ones I made looked more like turnips... very CUTE turnips. I had to make the strawberry short and fat to sit on top of the jar without sticking down into the jar; and the green ribbon tops coming out, did not look like a strawberry. My friend gave me some valuable advice to add ribbons coming down onto the berry and Voila!! Perfect!

Here is the pattern for you to make one of your own. ENJOY!πŸ’

Supplies:
Yarn: I used worsted weight. You can use whatever you like. It doesn't take much!
         I used: Red- Red Heart Super Saver / Pink- I Love This Yarn
F hook
Stitch Marker
Yarn Needle
Ribbon. I used 3/8" and 5/8"
Scissors
Lighter
Hot Glue
Polyfil

Terms:
MR: magic ring
INC: increase 
SC: single crochet
DEC: decrease (I use the invisible decrease)
This pattern is crocheted in the round. Use your stitch marker to keep up with rounds. 

R1: MR 5 SC (5) Leave a long tail to tie the ribbons onto
R2: INC around (10)
R3: SC around (10) Pull the MR tail tight and weave in a couple of times to secure the MR.
R4: INC around (20)
R5: SC around (20)
R6: *SCx3, INC* around (25)
R7: *SCx4, INC* around (30)
R8: *SCx5, INC* around (35)
R9: *SCx6, INC* around (40)
R10-11: SC around (40)
R12: *SCx6, DEC* around (35)
R13: *SCx5, DEC* around (30)
R14: *SCx4, DEC* around (25)
R15: *SCx3, DEC* around (20)
R16: *SCx2, DEC* around (15)
Cut long tail.
Cut ribbons into different lengths. Run your lighter across the ribbon ends to keep from fraying.
I used 3 different ribbons and cut 6 total in varying lengths from 3" - 5".
Bunch your ribbons and wrap the MR tail around them to secure down into the berry. 


It is easier if you flatten your berry. Carefully stuff the berry with Polyfil around the ribbons. DO NOT OVERSTUFF and be careful not to pull in the point of the berry.


Use your yarn needle to weave the last tail in and out of the front loops of R16. Pull to close, then fasten off your yarn.


Using 5/8" ribbon, cut 4: 2 1/2 pieces on the diagonal with each end going in the same direction.
Run your lighter across the ribbon ends to keep from fraying.
Fold your 4 pieces in half to form a "V". Hot glue inside the fold to secure, then glue around the berry.


Pop your berry on top of your jar and ENJOY!!


Tuesday, July 4, 2023

Cheap, Quick and Easy Layered Summer Dessert


Happy Independence Day!! Let's celebrate the day (or any day) with this cheap, super quick and super duper easy layered dessert!!

I came up with this idea on my way to a family get-together. I had not felt well, so I didn't feel up to making a complicated dessert. We stopped at our local grocery store to pick up a pre-made dessert, when what to my wondering eye did appear???? But shiny red strawberries, hanging out beside an angel food cake my dear!! "AHA!!" I did squeal, and the idea formed in my head... with other ingredients too.... blueberries and Cool Whip!

Since we were going to a family gathering where several have trouble with their sugar, I chose a sugar-free angel food cake and sugar free Cool Whip. I also bought an adorable strawberry slicer and off we went! I borrowed a bowl and assembled it in very little time.

You can either prepare the cake pieces and slice the strawberries ahead of time... or.... make it as you go. That is usually what I do. 

This is so easy....

Grab a big bowl. A trifle or glass bowl would be perfect to showcase this beauty. But, alas, I got rid of mine while decluttering.

Ingredients:

1 Angel Food Cake

1 lb strawberries, rinsed and fairly dry

1 cup blueberries (optional) rinsed and fairly dry

1 tub Cool Whip

Pinch cake into bite sized pieces. Cover with a layer of Cool Whip and then berries. Repeat this until you use up your ingredients. Make the top pretty!!

Let your dessert chill for maximum flavor... the longer the better!

Enjoy!!!


Sunday, July 2, 2023

Patriotic Shelf Sitter: My first crochet pattern is up for purchase!

This has been an exciting week!! After a very long pattern writing process and an ordeal to reopen my Etsy  and Ravelry shops, I have put up my first listing.... my crochet pattern for this little fella!! He is a Patriotic Shelf Sitter.


I first saw the idea for a shelf sitter in a crochet doll group I am in. Someone had modified one of the doll patterns to have longer legs and arms and be able to sit on the edge of a shelf. I loved the idea! And soon I was off on an adventure of my own to also modify the dolls into adorable little decorations. After making several, ideas were bombarding my mind of how to streamline my own pattern that I could adapt into different characters for different holidays. I had a certain idea for how I wanted the hands and feet to look. So I began my journey with a bunny. 


Pattern available on THIS previous post.

I love to decorate for holidays. I decorate my home and my office cubicle. These shelf sitters are perfect for decorating. After making the bunny, I wanted something for the 4th of July. At first, I was going to make good ole' Uncle Sam, but then I was seeing a lot of vintage Independence Day art on Pinterest and this little fella came into being. 

Can't you just picture him sitting in a little wagon on the side of the street, waving his little flag as the parade goes through town? That is totally what I see.

This patten is fairly easy. If you are a beginner, I do have a link to helpful YouTube videos included in the pattern. It also works up quickly, so you still have time to whip one up before the holiday!

Pattern is available in My Etsy Shop and My Ravelry Store.


I'm Moving!!

  In an effort to build my pattern designing business, I now have my own domain! Visit my NEW blog at:  thewhimzb.com   Come on over and see...